| May 9, 2022
From Archival Sources to Computational Analysis, Part Two
In our last post, we explained how we used Tropy to organize photographs of bound bills into items, concluding with the export of the item metadata using the Tropy CSV Export plugin. This post covers the other part of the process of going from digital images to items in a datascribe item set. If you look at the workflow image, we’ll be describing work that takes place in the “Image Processing and CSV Creation” and “Omeka S Item Creation” areas.
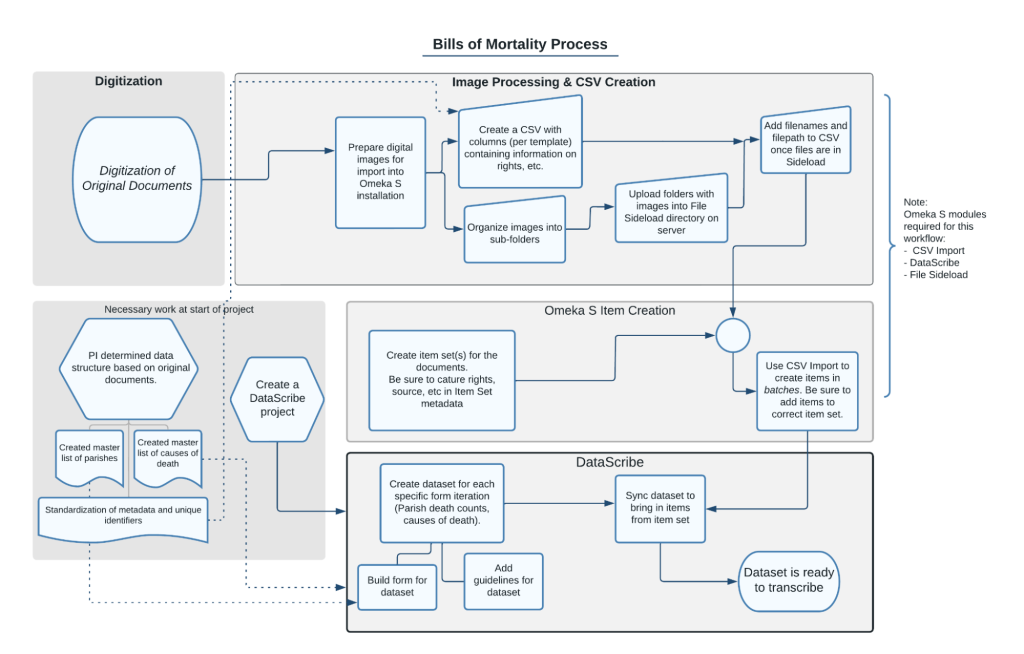
Figure 1. diagram of image preparation workflow showing process from digitization to image processing and CSV creation to omeka s item creation to datascribe transcription.
At this point in the process we have a csv and a lot of digital files—possibly organized but maybe not. Each row in the csv file will become an item in our Omeka S installation. Before we can use the csv with the Omeka S CSV Import module, we need to do some further data cleanup.
The first thing is to rename the columns in the sheet, both to make them more human-readable and to take advantage of the Omeka S ability to automap the metadata. Tropy uses the uri for the Dublin Core vocabulary and property, regardless of the Tropy template label, which means that the heading are things like “http://purl.org/dc/elements/1.1/creator” rather than “Creator”. We change these headings to match the labels we use for our Omeka S resource templates.
The next step also involves tweaking a key piece of the information exported from Tropy: file paths. Using Tropy means that we have the right file names for the images associated with each item. However, the file paths that Tropy exports point to where the files are on the computer of the person who did the sorting. In order to import into Omeka S, we use the FileSideload module, which requires a team member to upload the files to the sideload directory on the same server. To make things simple, we use the same directory structure locally in Tropy and on the server. Setting things up this way means that we can change the start of the file path in the data exported from Tropy and point to the image files now on the server.
Finally, we add a unique title for each item. The titles we use in this project follow a set pattern, so it is easier to generate them in the spreadsheet than enter them manually. We use a combination of the functions Concatenate and Mid to generate a title for each row that follows the format of YYYY-WW-CollectionName-BillType where Y is the four-digit year and W is the two-digit week number. If the item was a weekly Bill of Mortality from week 13 of 1664, the item name would be 1664-13-Wellcome-Weekly.
Once this step is done, our csv should have full metadata, a proper title, and accurate file paths for every item. It is ready for importing into Omeka S! But is our installation ready?

Figure 2. Flowchart showing that multiple items go into an item set which then feeds into different datasets.
At some point during the processing of the images and cleanup of the csv file, there is also work to do in the Omeka S installation. DataScribe uses item sets to populate datasets for a given project, so we need to be sure to create the item sets with the needs of the datasets in mind. In this project we have different datasets for weekly and general bills, but we can use the same item set for multiple datasets within this project.
We currently have separate item sets for the Wellcome weekly bills and the post-fire Wellcome Weekly Bills, because the latter are particularly complicated and will be transcribed separately.
With all of these pieces in place—a tidy csv, files ready to go on the server, and item sets created—we can create the items in Omeka S! Running a successful import is a matter of making sure to check the right boxes and remembering the settings. Luckily we have documented all of the basic settings. Even if something goes wrong, we can undo the import and run it again. When the imports are done, the items and item sets are ready to be used in as many datasets as we need.
-Megan S. Mitchell and Megan Brett